|
Academy Topics
Articles relating to Active Worlds
Help with Objects, Textures, Masks, Coronas, Movers, Avatars, Sequences and more.
Guides on how to do various things in Active Worlds
Graphics, ads and sounds for use.
Downloadable AWG's, Particles, Movers and Building Code
Resources (...)
SW City Network
|
|
|
Centering AWGs (Using Objects)
|
Foreward
The method explained below works well, but is a very clunky and archaic version of centering. The best method to use would be the Coordinate Copy method, which is explained well in Bach Zhaa's blog post. The below is basically obsolete, but will remain here for historical purposes.
Background
An AWG is a file type which AW build 963 introduced. These are created and used within AW to save a clump of objects together to dump copies of it elsewhere. In other words, it's an import/export system for clusters of objects.
When you select the objects you want to save, AW looks at the location of the 6 outermost objects (left, right, forward, back, up, down) and calculates the center. This serves as the clump's center point. The six outermost objects used to calculate the clump's center point are called centering objects.
Here is what happens when one doesn't use centering objects. To place the clump of objects in-world, right click on an object. This serves as your base object. Click on the Load Object Group button and select your AWG file of choice, then click Open. AW will now build the objects in the AWG file in-world. To do this, it will use the base object's center point, which is the object's rotation point, and it will match that up to the clump's center point so that the clump of objects being built are centered on the base object's center point. For example, let's say your AWG that you want to load is a cube of pp01.rwx objects and your base object use a walk001.rwx object. The rotating axis of walk001.rwx (the base object's center point) is in its exact center. So when you load your AWG file, the cube of pp01.rwx objects will be horizontally bisected by the walk001.rwx object. The cube is perfectly centered around the base object's center point on all three axes.
Because of this, it is often necessary to center your AWGs so that they don't end up halfway submerged in the ground or floating in the air. The purpose of this article is to teach you how to do this. Below is a list of terminology that briefly defines the concepts talked about above.
Terminology
- Base object: the object you select/create to load the .awg file from.
- Base object's center point: the axis point where the object rotates at.
- Clump: the .awg file, a clump of objects.
- Clump's center point: the calculated center point between all the objects in the clump.
- Dump: when AW builds the AWG file in-world.
- Centering objects: the 6 temporary objects used to create an artifical center point on a clump.
Centering
Because AW only uses the 6 outermost objects and calculates the center point in between all of them, you can create an artificial center point for your object group by creating temporary objects located beyond all the objects you're saving. This is best explained through example. Let's say you wanted to save a nice urban sidewalk street light you made.
- First, it is recommended you build this in a sandbox area, with nothing around. This is because you cannot move around while selecting objects, so we just want to do a cell select (ctrl+right click) on the objects. Doing this in a developed area would cause you to select surrounding objects not part of the desired clump.

- After building what you want to clump together, determine where you want the center point. When you dump an .awg clump, the base object's center point (the point where it pivots when you rotate it) becomes the .awg clump's center point. For this street light, the best place to make the center point would be where the pole meets the sidewalk.
Remember, if you do not manually specify the center point, then AW will just create it, which will make your street light underground and offcenter when you place it.
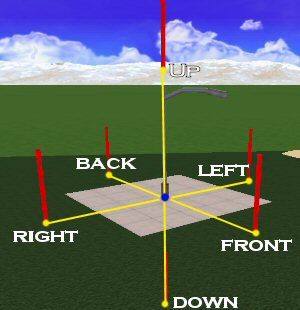
- The street light pole, at the base where it hits the concrete, is going to be the center point. So, all you have to do is create 6 objects moved an equal distance from this point. One east, one west, one north, south, one up, and one down. Move these objects an equal distance from the point. For example, if you move the east object 5m away from the point, the west object must also be 5m away. Remember, these objects must be the outermost objects in the clump.
- Once you place all 6 centering objects, you can test if they're placed right by selecting 2 on opposite ends (like east and west) and rotating them around. They should pivot around the desired center point.
- If all is well, you can then save the clump.
- Remember, when you dump the clump, it will be loaded in the direction it was facing. For this reason, it is recommended you save all four major directions - east, west, north, south. After saving that first clump you made, keep everything selected, and rotate it 90 degrees and save again. Repeat until all desired directions are saved.

- Open up your newly saved .awg files in a text editor like notepad for example.
- Listed inside you'll see all the saved objects, their action commands, coords, and other information. Try to pinpoint the temporary centering objects you made, and delete them out. For this reason, it is recommended that you make your centering objects easy to spot. For example give the centering object's "CREATE COLOR RED", which should make them stand out in the file.
Other Notes
You can only select up to 128 objects. If you're trying to clump whole buildings, you'll have to do it in parts. All parts would have to have to be using the same set of centering objects.
- You can now select up to 1024 objects at one time, great for moving much larger builds. See the Selecting 1024 Objects article on how to enable this. Still, if you're trying to clump whole buildings that are over 1024 objects, you'll have to do it in parts. All parts would have to have to be using the same set of centering objects.
- Only the centering object's axis point counts for its position. You can use any sized object, and rotate it around to make it easier to see.
- Only the 2 objects of the same axis need to be an equal distance from the center point. For example the east-west objects can be 4m from the center, and the north-south can be 10m, and the up-down can be 15m.
- The centering objects need to be aligned to the world's grid alignment. You can't be moving them northwest or at any angle.
|
|
|

